SwiftUI Data Flow 2023
SwiftUI is a reactive framework where the data drives the UI. In 2019, I wrote a post detailing how I manage the various forms of data flow through a SwiftUI app, and with the help of others in the community, I iterated over this until I had a good understanding of the concepts and which methods you should use when. In 2021, I updated the post to cover the minor changes, but there have been no major modifications since then.
At WWDC 2023, things changed a lot! With the introduction of Swift macros, the SwiftUI team was able to reduce the number of property wrappers need to send data around, and remove a lot of boilerplate code.
For this article, I have re-written my sample app as a Mac app and updated it to use the new data macros.
Updated 10th July 2023 to cover changes in version 3 of all the betas.
Table of Contents
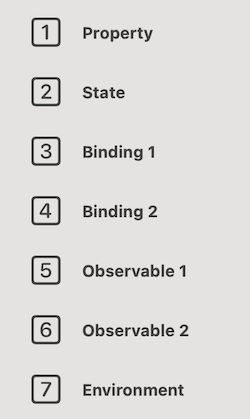
- Observation
- Sample app
- Property
- @State
- @Binding
- @Binding for a Structure
- @Observable and @Bindable
- @Observable and @Bindable List
- @Environment
- Wrapping Up
With the release of all the version 3 betas, I have added these sections:
- Old code still works
- Observed properties no longer require initial values
@Environmentproperties cannot be used for bindings.
Observation
In the WWDC talk on Discover Observation in SwiftUI, Apple showed the following flow chart:
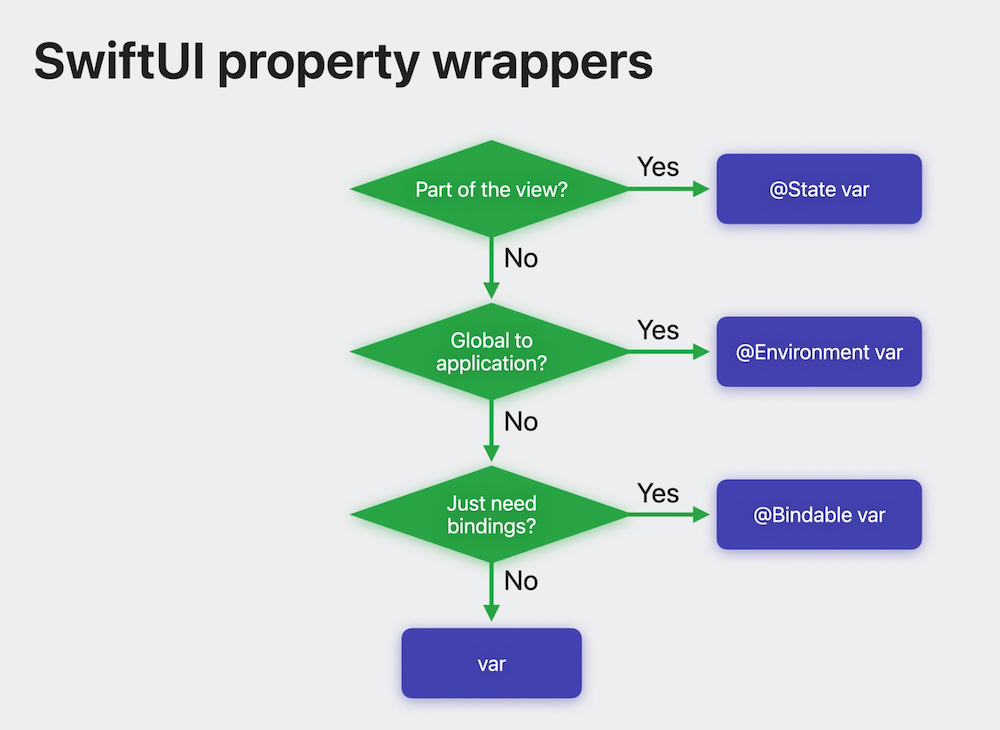
This is a good starting point, but I feel that it leaves out a few cases, so I’ve made my own:
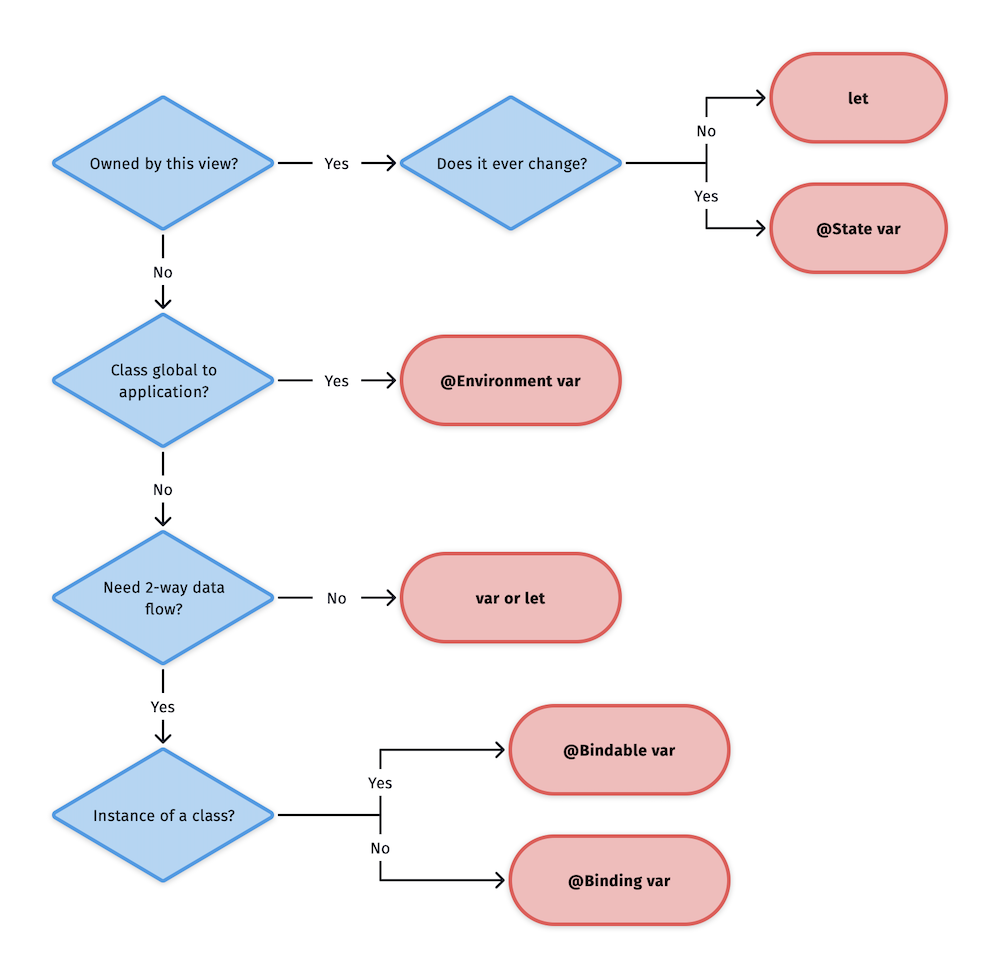
Apart from adding some details to the decisions points, there are really only two additions to my chart:
- If a property doesn’t need to change, it can be a
let. @Bindableonly works for classes. The equivalent for structs or primitive data types is still@Binding.
The new macros system removes this protocol and property wrappers:
ObservableObject@ObservedObject@EnvironmentObject@Published
That’s a lot of typing we don’t have to do any more!
UPDATE 1:
I didn’t make it clear originally, but all these property wrappers still work, and you can still use @Binding for classes, so you can adapt to the new Observation code incrementally. The Apple developer site has a very useful article on migrating from ObservableObject.
Sample app
My sample app demonstrates the following data flow options:
The code is available on GitHub and I recommend you download the project and follow along. It requires macOS 14 and Xcode 15. Currently I’m using macOS 14.0 beta 3 (23A5286g) and Xcode 15.0 beta 3 (15A5195k), but I will update this article with any changes as we work through the beta cycle.
Because Xcode 15 now supports live previews for Mac apps, you can test all the options from inside Xcode. In the Project navigator, expand the numbered groups and preview the first file in each group to view and interact with that data flow type.
Or go to the Bookmarks navigator where I’ve used the new bookmaking system to provide quick links to each one. You can even check off each one as you finish that section.
In the code snippets below, I include the essentials, but strip out most display modifiers and some similar views to keep the code short. The project contains the complete code.
Property
The first option is using a static property. We get so caught up in property wrappers that it’s easy to forget that SwiftUI doesn’t always need them. Using static text from a constant may seem like a simplistic and obvious example, but separating it out allows for localization or re-usability as well as making the view body neater and easier to read.
struct Property: View {
  // static property that never changes
  let greeting = "Hello from SwiftUI!"

  var body: some View {
    // Using the property directly in a View
    Text(greeting)
  }
}
My flow chart shows two use cases for let. This covers the first one where the view owns the property. The second is when a parent supplies the property to a view but the child view never changes the property. You’ll see an example of this later on in this article.
A parent view may have some dynamic data that it uses to set properties in a subview where the subview only needs to display the data statically. This data will still change as the parent view changes but the subview will not be able to change the data itself or in the parent view.
If a view owns a property or gets it from a parent but doesn’t need to change it, use
let.
@State
This is where things start to get interesting in the SwiftUI world. SwiftUI views are contained in structs, so are non-mutable. Also, views are re-created every time the data changes, so any properties are re-created then too. By marking a property with the @State property wrapper, you are telling SwiftUI that you want it to keep this data in a separate portion of memory, allow it to be mutated, and preserve the current value during view refreshes.
struct UsingState: View {
  // Using @State as this view owns and can mutate the property
  @State private var counter = 0

  var body: some View {
    // Displaying and editing @State property
    VStack {
      Text("Counter = \(counter)")

      Button(action: {
        counter += 1
      }, label: {
        Image(systemName: "plus.circle")
      })
    }
  }
}
In this example, the counter property uses @State. The text view displays it and the Button view can change it. The button’s action changes the counter which causes the view to redraw in order to display the new value, but the value of the @State property does not get reset to 0 every time.
Whenever a view owns the property and that property is mutable, declare it using the
@Stateproperty wrapper.
@Binding
The Apple flow chart mentioned @Bindable but that only works with observable classes. For connecting structures or primitive data types to subviews, use @Binding. Apple does this internally for controls like Toggle and TextField.
A problem with building SwiftUI views is that it is very easy to end up with a gigantic Pyramid of Doom as you embed views within views within views. Extracting subviews is a great solution, but then you need a way to pass the data to a subview in a way that allows the subview to edit that property and have the edits flow back to the parent.
This is where @Binding and @Bindable come into play.
The Binding 1 example uses a primitive data type - in this case an Int. The parent Numbers view declares it using @State because it owns the property, and it displays the value. The Numbers view passes the property to the NumberChooser subview as an @Binding property by using the $ prefix.
struct Numbers: View {
  // Using @State as this view owns and can mutate the property
  @State private var stepperValue = 0

  var body: some View {
    VStack {
      // Display @State property
      Text("Parent view value = \(stepperValue)")

      // Pass to subview as a Binding ($) for two-way editing
      NumberChooser(stepperValue: $stepperValue)
    }
  }
}
The NumberChooser subview has this property marked with @Binding. It has no initial value as this view expects to receive the value from its parent view. NumberChooser has a Stepper for changing the value of the property. It displays the value after each change and you can see that the value displayed in the parent view also changes as the change flows back.
struct NumberChooser: View {
  // Using value from parent with 2-way binding
  @Binding var stepperValue: Int

  var body: some View {
    VStack {
      // Using bound state from parent with 2-way binding
      Stepper(value: $stepperValue, in: 0...20) {
        Text("Value in child = \(stepperValue)")
      }

      // Using bound state from parent as property
      // this view cannot change the value
      NumberBlock(stepperValue: stepperValue)
    }
  }
}
NumberChooser has its own subview - NumberBlock. This is purely a display view that never edits the value. NumberChooser passes it the value and it stores it as a let. Whenever the value changes, SwiftUI redraws the view with the new value, and the display updates. This demonstrates the second use of let that I talked about in the property section. There is no need to make this a var because it doesn’t change - it gets re-created with every update.
struct NumberBlock: View {
  // As this view never changes the value, there is no need to bind it
  let stepperValue: Int

  var body: some View {
    Image(systemName: "\(stepperValue).square")
  }
}
@Binding for a Structure
The previous example showed how to use @Binding for a primitive data type like Int, String etc. But bindings also work for any value type, including structures, and that’s what you can see in Binding 2.
While this is not very common, I enjoyed writing this example for a couple of reasons. Firstly, it shows how to draw the UI based on the different cases in an enum. Check out Pizza.swift which has three enums. Each of the picker views loops through one of these enums to draw the view.
Secondly, it demonstrates how you can pass portions of the data model to a subview, instead of sending everything everywhere.
PizzaView has a Pizza property declared using @State because this view owns the data. It draws a Form containing three different pickers. Each picker gets a binding to one of the properties of the pizza. A Text view shows the assembled data to confirm that the parent knows about any changes.
struct PizzaView: View {
  // Using @State for a struct
  @State private var pizza = Pizza()

  var body: some View {
    VStack {
      Form {
        // Using 2-way binding but each component
        // only needs 1 property from the struct
        PizzaNamePicker(selectedPizzaName: $pizza.name)
        PizzaSizePicker(selectedPizzaSize: $pizza.size)
        PizzaCrustPicker(selectedPizzaCrust: $pizza.crust)
      }

      // Text representation to prove that the
      // subviews are modifying the parent struct
      Text(pizza.pizzaSelection)
    }
  }
}
I won’t show the code for all of the pickers, but here’s the one to select the size:
struct PizzaSizePicker: View {
  // A single property of the Pizza struct is passed hare.
  // It's a Binding so data flows 2 ways.
  @Binding var selectedPizzaSize: PizzaSize

  var body: some View {
    Section(header: Text("Select your size:").font(.headline)) {
      Picker("", selection: $selectedPizzaSize) {
        ForEach(PizzaSize.allCases, id: \.self) { pizzaSize in
          Text(pizzaSize.rawValue.capitalized)
        }
      }
      .pickerStyle(.segmented)
    }
  }
}
If you’re passing a primitive data type or a struct to a subview, and the subview can change the value of this property, use
@Bindingin the subview and pass the property with a$prefix.
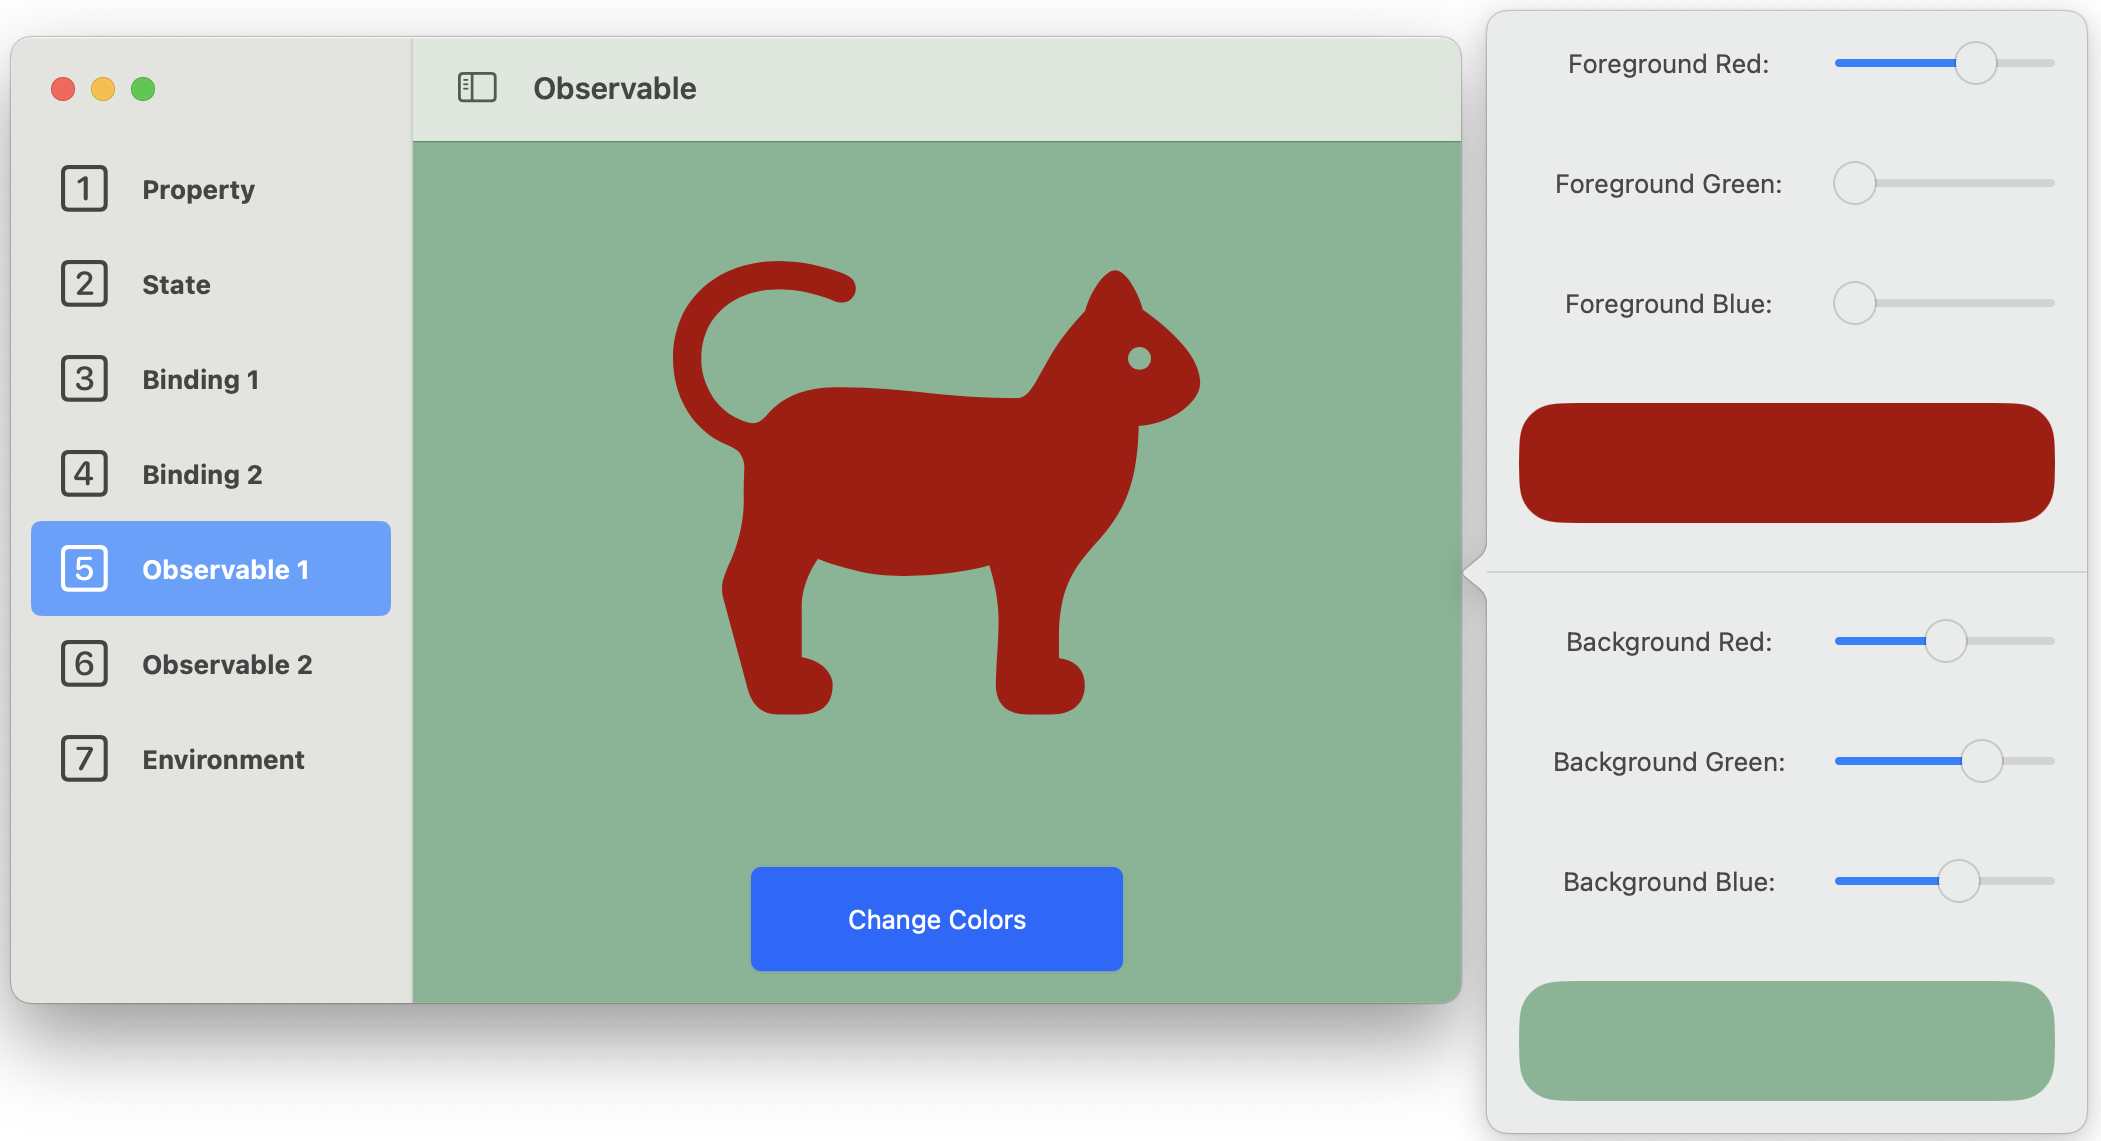
@Observable and @Bindable
So far, the examples have been largely the same as before. Now the new property wrappers appear. The first big change is in the model class: ColorSet.
import SwiftUI
import Observation

@Observable class ColorSet {
  // Observable class
  // The color components are not private so any changes
  // get published to the views that are observing

  var foregroundRed = 0.0
  var foregroundGreen = 0.0
  var foregroundBlue = 0.0

  // Computed variables to create the RGB colors from the components
  var foregroundColor: Color {
    return Color(red: foregroundRed, green: foregroundGreen, blue: foregroundBlue)
  }
}
The first thing to notice is the new import: Observation. This is the library that supports the new @Observable macro. Previously, ColorSet conformed to the ObservableObject protocol and the properties that needed to be observed were marked with the @Published property wrapper.
Now the class uses the @Observable macro and any property that isn’t private, is automatically published. This is only available for classes, not structures.
UPDATE 2:
The properties must all have an initial value - setting them in an init is not sufficient and will not build.
In beta 3, observed properties no longer require an initial value. For this class, I actually want to specify initial values, but in the next section, I do not.
If you want a look at what’s happening inside the macro, right-click on @Observable and select Expand Macro. When you’ve finished, right -click again and choose Hide Macro Expansion.
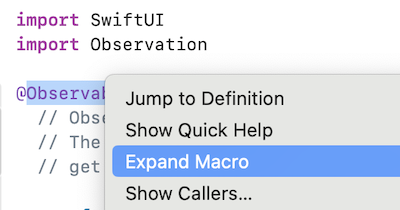
While this is not something I can read comfortably, it shows how macros are regular Swift code that saves a lot of typing, but are not doing magical things invisibly in the background.
Now that the model uses the new macro, how do we use it?
Again, the owning view declares it using @State.
struct ColorSetView: View {
  // Using an Observable for reference-based data (classes)
  @State private var colorSet = ColorSet()

  // ...
}
The ColorSetView uses the data to add color modifiers to the view background and to a system image of a cat.
But the next change is when sending the data to the ColorChooser view. This needs two-way binding so the current values can be passed to the chooser and any changes can be passed back. But with the new Observation methods, this uses @Bindable and not @Binding.
First, the ColorChooser gets the colorSet property, but this doesn’t need the $ prefix.
ColorChooser(colorSet: colorSet)
The ColorChooser view receives it as @Bindable and can in turn, pass it down to its subviews, again using the @Bindable technique which requires no $ prefixes.
struct ColorChooser: View {
  @Bindable var colorSet: ColorSet

  var body: some View {
    // The chooser subview also get passed the Observed
    ForeColorChooser(colorSet: colorSet)
  }
}
There is one oddity to beware of. When declaring the original colorSet property, I use @State but if I declare it as a simple var, the app still works. Don’t do this!
If you remember the older code style, the owning view initialized an ObservableObject using @StateObject. Subsequent views declared the same property using @ObservedObject but it was very important for the owning view to use @StateObject to avoid strange and difficult to trace bugs. The app worked if you used @ObservedObject instead of @StateObject for the original declaration, but then odd things could happen.
I think this is the same, and it’s just as important for the owning view to declare the original property using @State.
@Observable and @Bindable List
In the original post, this was the section that gave me the most trouble - having a list of data objects where each one could be edited and updating the original list to show the edits.
This is now a lot easier, although it took me some time to realize this.
I have a sample data file and a Person model class using @Observable. The PersonListModel class holds an array of these Person objects and it also uses @Observable.
I wanted to make the selection of the list point directly to a Person instead of going through an id, so I added this extension to Person:
extension Person: Hashable, Equatable {
  func hash(into hasher: inout Hasher) {
    hasher.combine(id)
  }

  static func ==(lhs: Person, rhs: Person) -> Bool {
    lhs.id == rhs.id
  }
}
Then I was able to set up a List to display the names of the people, with the list’s selection bound to an optional Person. I had to add a tag to the person, I presume the tag is set to the id by default.
List(selection: $selectedPerson) {
  ForEach($personList.persons) { $person in
    Text(person.fullName)
      .tag(person)
  }
}
Two important things to see in this code snippet:
- The contents of the
ForEachis a binding as you can see from the$prefix - The argument passed in to each entry in the list is also a binding.
These two bindings make the list respond to edits.
With this in place, it was time to think about an editor and I decided to try out the new inspector. Unfortunately, unlike with sheets, you can only trigger an inspector with a Boolean so I added an event listener to set the inspector trigger:
.onChange(of: selectedPerson, { oldValue, newValue in
  shouldShowInspector = newValue != nil
})
After that, I added this inspector modifier:
.inspector(isPresented: $shouldShowInspector) {
  if let selectedPerson {
    PersonEditView(person: selectedPerson)
  }
}
Even though shouldShowInspector is only true when there is a valid selectedPerson, force unwrapping causes a crash as it appears that the inspector tries to draw itself off-screen on launch.
The PersonEditView in the inspector receives the person as @Bindable and populates the fields on a form. And editing the data flows right back to the list.

This took a lot less code than the previous version. Part of the improvement was the ability to use bindings in a list, which we got last year, but another big part was using the Person directly as the selection. This needs the Hashable and Equatable conformance, which I think should be a standard part of Identifiable, but once that’s in place, all the data flows smoothly.
If I was using a sheet for the editor, it would be even neater as I could tie the sheet’s appearance to selectedPerson.
When you have a model class and you want changes to be published, declare the class with the
@Observablemacro. The owning view declares the model using@Stateand can pass it to editing subviews using@Bindableor to display subviews aslet.
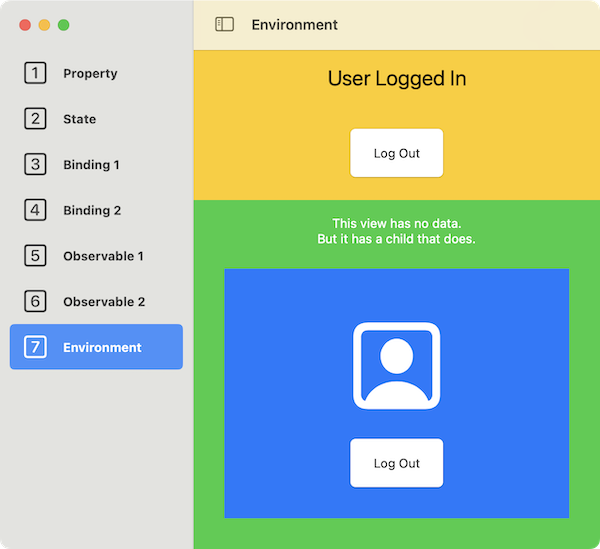
@Environment
The last section is Environment, which again, has changed a lot. The benefit of using Environment is that the data flow doesn’t have to be unbroken. In the sample app, the parent view (NestedViews) uses the Environment property and so does the GrandChildView, but the ChildView in the middle doesn’t.
Setting up a property for Environment is the same as for Observable.
import Observation

// An Environment class is just like any Observable class
@Observable class UserSettings {
  var isLoggedIn: Bool = false
}
The difference is in the way that you use it. When creating the first view that needs this environment value, use an environment modifier to inject the initial value. In the sample app, this happens in DataLink.swift which displays the view for each example.
NestedViews()
  .environment(UserSettings())
To access this property, declare an Environment property with a key path, which is its type, in this case UserSettings.self.
struct NestedViews: View {
  // The injected environment property is accessed by type and assigned a name
  @Environment(UserSettings.self) private var userSettings

  var body: some View {
    // ...
  }
}
This is similar the way we use built-in environment values like colorScheme, openWindow and so on. Use this same declaration in any view that needs access.
Previews need to get access too, like this:
#Preview {
  // The environment object must be injected into the preview too.
  NestedViews()
    .environment(UserSettings())
}
And even though ChildView doesn’t use the environment object, because its preview contains GrandChildView that does, it also needs the environment modifier in its preview, but not in the main view code.
In the sample app, the various nested views are brightly colored to show which is which. Using the Log In or Log Out buttons works on either the outer view or the inner view with the data being synced between them.
If you have a class that is global to your app, like UserSettings in this example, declare the class with the
@Observablemacro. Inject it into your view hierarchy using.environmentand then use@Enviromentto access it.
UPDATE 3:
There is one aspect of using @Enviroment where things get tricky, and that’s if you need to use any properties of the environment object as bindings for other controls.
I added a Toggle to GrandChildView and wanted to connect it to the same userSettings.isLoggedIn Boolean. A toggle takes a binding, so normally, I’d do this by adding the $ prefix to the property to bind.
With @Environment, this gives an error:

The solution is to create an intermediary @Bindable property from the @Environment property and bind it to the toggle (or any control that needs a binding).
Stripping out a lot of what was there, the code becomes:
struct GrandChildView: View {
  @Environment(UserSettings.self) var userSettings

  var body: some View {
    @Bindable var userSettingsBindable = userSettings

    Toggle(isOn: $userSettingsBindable.isLoggedIn, label: {
      Text("Log In Status")
    })
  }
}
You declare the @Environment property as usual, then inside the body, declare an @Bindable property with the value from the @Environment property. You have to do this inside the body because doing it outside gives an error.
Surprisingly, I didn’t have to add a return before the Toggle, even though it was no longer the only statement in the body.
Thanks to Stewart Lynch for suggesting I add this. Hopefully it will be fixed soon but until then, this is the workaround.
Wrapping Up
There are two issues I want to discuss before ending.
First is the use of private for view properties. Apple recommends marking every @State property as private. It seems a bit strange as you then pass them around and sometimes the subviews change the data, but it means that no object can edit the value unless the view has expressly given permission. I presume there are security and performance benefits to this.
Similarly, @Enviroment properties can (and I presume, should) be private. The two binding property wrappers do not allow their properties to be private.
And lastly, in @Observable classes, everything that is NOT private is published. This is the opposite to what we had before where you had to explicItly state which properties were published. So mark properties as private if they should not be published.
The other issue is to do with using var on its own i.e. without any property wrapper. The Apple flow chart suggests doing this if you get to the end of the flow without making any other decision, but I think you should use let in this case. The only time I use a plain var in a view is for computed properties, otherwise I use let.
In my flow chart, I left the appropriate end point showing var or let, to better match Apple’s, but I recommend using let and only changing to var if Xcode complains. This is a good rule for any Swift code, not just SwiftUI.
This article may get several updates before we exit this years beta cycle, but I thought other people might find it useful. Writing it certainly helped clarify the new options in my head.
If you have any suggestions, ideas or corrections, please contact me using one of the links below or through the Contact page. And if you found this article useful, I’d love you to buy me a coffee.